

Dave, If the 4 speed is from a small block Mustang it will bolt right in, you will need to get a speedometer cable assembly for a 4 speed car as the 3 speed will now be too short.

Iowa's 5F09K project
-
iowa_old -
May 3, 2010 at 10:45 PM -
Closed
-
-
also,
can one put the dual point distr
into a reg 289 engine?
thanks
dave
-
<BLOCKQUOTE id=quote><font size=1 face="Verdana" id=quote>quote:<hr height=1 noshade id=quote>
also,
can one put the dual point distr
into a reg 289 engine?
thanks
dave
<hr height=1 noshade id=quote></BLOCKQUOTE id=quote></font id=quote><font face="Verdana" size=2 id=quote>
Sure. Why?
Jim
-
well my son's 66 needs OH'ed
so could use the hipo one while it's out
since my hipo is not yet ready for it!
d
-
I'd just take the stock distributor and Pertronix it!<img src=images/icon_smile_big.gif border=0 align=middle><img src=images/icon_smile_big.gif border=0 align=middle>
-
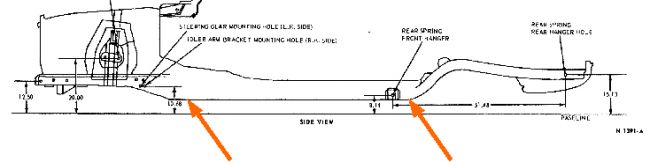
hello again
here is the diagram out of the '65 shop manual
i have marked two area's;
ie the front bottom of the frt inner rail
and the frt part of the rear inner rail.
Q are these level as drawn?
since my rotissorie is done
i'm about ready to to construct the jig
to rebuild the floor components
thanks
iowa
[Blocked Image: http://www.surfacezero.com/g503/data/500/medium/k_car_dim_diagram_copy.jpg]
-
<BLOCKQUOTE id=quote><font size=1 face="Verdana" id=quote>quote:<hr height=1 noshade id=quote>
i have marked two area's;
ie the front bottom of the frt inner rail and the frt part of the rear inner rail.
Q are these level as drawn?
since my rotissorie is done i'm about ready to to construct the jig
to rebuild the floor components
<hr height=1 noshade id=quote></BLOCKQUOTE id=quote></font id=quote><font face="Verdana" size=2 id=quote>
In a word - no. The reference dimensions are from a fixed flat surface to the points on the front (steering gear - bumper mt) and to the leaf spring mounts at the rear. Those are used to make the car track and steer properly (along with the dimensions on the other view). Your drawn in reference points may or may not be at the same height, level or parallel when those other dimensions are met.
Jim
-
okay, thats alright
one MUST go from the the distances
from the holes to the ref. line
will do
thanks
iowa
-
i don't seem to have the front hole
on the front frame extension
per the diagram above;
there are just spot weld marks in this area.
i'm sure this is an original piece.
could someone measure exactly where this hole is located?
iowa
[Blocked Image: http://www.surfacezero.com/g503/data/500/medium/2010_09_05_frt_frame_exten.jpg]
Edited by - iowa on 09/05/2010 10:29:37
-
hmmmmm....
no answer to my hole Q
have another Q
how does one remove and install the drip rail chrome piece?
thanks
iowa
-
It's the front bumper bracket front holes; an ancient tool known as a "church key"; a rubber headed mallet.
Jim
-
the front bumper bracket holes are clearly marked
and the measurement looks like it is from
the little hole in in front of and a smidge lower than them?
iowa
-
Never seen a hole in that location. I think it's just an arrow pointing to the two bumper brace holes and the distance given indicates the distance to the two holes from the ground.
-
<BLOCKQUOTE id=quote><font size=1 face="Verdana" id=quote>quote:<hr height=1 noshade id=quote>
Never seen a hole in that location. I think it's just an arrow pointing to the two bumper brace holes and the distance given indicates the distance to the two holes from the ground.
<hr height=1 noshade id=quote></BLOCKQUOTE id=quote></font id=quote><font face="Verdana" size=2 id=quote>
Exactly -
Jim
-
i'll have to take your word for it
it just seems odd that the indicator line
isn't pointing at the right holesin the frame
i just want to construct the jig correctly
this is difficult to do when
the front inner rail is bent upwards out of shape
and the rear end of the rear inner rail
has been sawn out!
iowa
-
<BLOCKQUOTE id=quote><font size=1 face="Verdana" id=quote>quote:<hr height=1 noshade id=quote>
hmmmmm....
no answer to my hole Q
have another Q
how does one remove and install the drip rail chrome piece?
thanks
iowa
<hr height=1 noshade id=quote></BLOCKQUOTE id=quote></font id=quote><font face="Verdana" size=2 id=quote>
I used a can opener. More like an old bottle cap opener. The clip that would grip the bottle cap is used to pull the trim upward. You more or less role the trim off the steel. I put a piece of fabric between the opener and the chrome trim. I started from the rear by the quarter panel and work up to the roof then stop at the curve. Then I would start from the front and work my way to the rear curve where you stoped and it will pop off. Putting it back on takes care but you can do it. This time you role it back on. Hope this helps.
Dave V.
-
thanks dave
i'll give it a try tomorrow
today i cut and have all the
little arms that are used
to hold the frame to the rotissorie
next will be to line everything up
and weld the jig tight
will be excited to see how things compare
to the shop manuals diagram measurements
dave
Edited by - iowa on 09/08/2010 19:31:04
-
is there a good thread
that explains how to correctly
install the distributor?
thanks
iowa
-
just a quick Q about my son's C code 3spd tranny
would a 'K' code toploader fit into his car?
thanks
iowa
-
Yes, is should
-
Participate now!
Don’t have an account yet? Register yourself now and be a part of our community!