Posts by mrkadra66_old

    Guys,


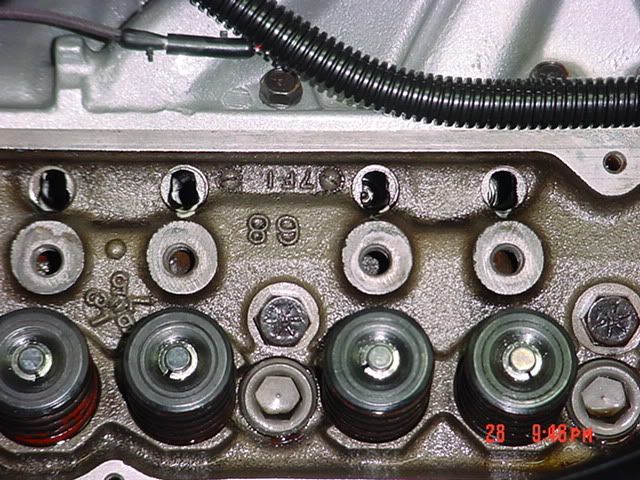
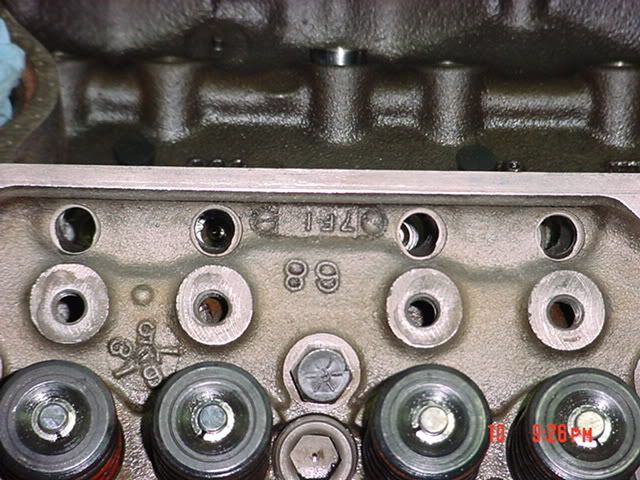
    I've been considering pulling the hipo engine currently installed in my '66 A-code coupe and offering it to someone here on HPM who may need an engine to help complete their kar. The history is as follows. My father installed the engine in the car back in the fall of '67 or spring of '68 as a service replacement long block from Ford. He wasn't happy with the original 225 hp A-code. The head date codes are 7F1, and 7H23. I can't see the block part number well enough to clearly read it behind the starter, but it might be C8OE 6015 A. The engine does not have a lot of miles on it. The odometer shows a little less than 44k on it now and was driven several years prior to the installation of the hipo. I don't know the exact mileage of it when the hipo was installed because I was only a few years old. From there, the car was driven a bit more and parked in '69 with 20k on it till the mid 80's when we fired her up again at which point I put the rest of the miles on the car. My father changed main bearings once back in the 60's and we rebuilt the heads before we restarted her in the 80's. From there, nothing else has been done to the engine till I installed Crane Gold full roller rockers and pushrods last summer. The intake is an Edelbrock Torker 289 with a Holley 600 DP carb and a pertronix module in the dual point distributor body. I refurbished the car around the engine over the last few years. She runs strong, but is starting to show a little weeping at the edges of the head gaskets and front/rear main seals. Probably time for a small tear down and rebuild.


    Anybody interested in the engine? Drop me a PM.


    Thanks,


    Mark

    I too have the P2 in mine. All the information I could find is that you do want a full 12v to the P2 not the coil voltage. Some seem to work fine from the coil voltage, but I wasn't going to risk it. The P2 shouldn't fry if the ignition is left on thats the P1, but I installed a simple toggle switch between the ignition switch and the P2 just in case I want to have the ignition on without the P2 for testing something else.


    Mark

    Well, decided not to pull the heads and complete the opening of the guide slots with the heads in place since the slot is only about the top 1/2" of the overall length of the opening through the head for the pushrod. I just didn't want to open the can of worms that may have come about by removing the heads. I covered the lifter valley with a layer of custom fit cardboard taped neatly to all edges and then did the same with the heads leaving only the slots exposed. I placed a magnet at the bottom of the hole to catch shavings while drilling and had an assistant run a shop-vac right next to the drill as I was drilling. I used a right-angle drill with a 1/2" stepped uni-bit. Worked like a charm!!


    Before:

    [Blocked Image: http://i214.photobucket.com/albums/cc295/mrkadra/DSC02100.jpg]


    After:

    [Blocked Image: http://i214.photobucket.com/albums/cc295/mrkadra/DSC02119.jpg]


    Ready to install the guide plates and get the car back on the road.


    Mark

    I studied the pushrod clearance issues more closely last night and decided I'm not comfortable with filing the guide plates. It looks as if some of the rocker arms would be out of line on the valve stem so I'm going to pull the heads and clearance the guide slots. So much for being on the road this summer!

    Fred, I agree with your comments on the slotted heads, but at this point, I'm not going to remove the heads to drill out the guide slots. My tweaking on the guide plates was with a hand file for a few thousands. If I pull the heads, it's going to be for a whole valve job and I don't have the resources for that right now. I'll let you know how it works out.


    Z Ray, did you have to massage your guide plates any?


    Thanks


    Mark

    Spoke to soon on Saturday. The studs and guide plates fit very nicely on the heads without the pushrods in place. When I went to drop the pushrods back in, I had a rub on 5 of the 8 intake side pushrods. Cylinders 2 and 5 thru 8. I tried flipping the plates over and twisting/pushing around under the studs, but it didn't help much. I finally ended up easing one edge of the slots and expanding the stud holes on the guide plates to clearance the pushrods. Anybody else have a similar situation? Do you think I have a problem to be concerned with or is Ford's machining process back in '66 just not that accurate?


    Mark

    Guys, it's been a while since I have been able to work on the rocker arm stud swap, but finally got started the last few days. The block plug on the DS is a PITA to get to behind the header! So, I removed one stud last night to see how thing will go and am confused/concerned. The stud I removed has the interference machined into the thread pitch like the picture above, but the threads also have a very square face. They do not come to a point like a standard bolt thread (if that makes any sense). All I can relate it to is the thread looks like the square thread on a big C-clamp, but a smaller version. Anyway, I tried to run one of the new ARP studs down into the head and it would not go. The new ARP stud has a typical pointed thread. Did anyone have the same problem? Do I need to run a tap down the threads to open them up? If so, is the crud that falls down into the water jacket a probem? I can't believe the thread is a different size... Any help would be appreciated!!


    Thanks a bunch!!


    Mark

    Thanks. I got on the ARP website and will order some longer studs. I also made some smaller custom shaped baffles and removed the excess casting materials from inside my cast valve covers. I think mine will clear with a double thick gasket as well.


    Any special tricks to installing the new studs? Basically unscrew the old one and screw in the new one with some thread locker and torque to specification?


    Thanks


    Mark

    I have had the Pertronix 2 and Flamethrower coil in my car for over three years now. Works great. Starts right away and is zero maintenance. Can't say it truly gives any more performance or economy. Just nice and simple. I think with the P2, you do need to use their coil. It is a little smaller in diameter so I wrapped a sheet metal shim around it and it fit right in the factory mount without issue. Hope that helps.


    Mark

    Guys, I had purchased a set of Compcams Pro-Magnum full roller rockers before I saw this thread and finally got around to installing them on my engine over the last few weeks. There seems to be very little thread left on the studs above the rocker arms for the polylocks to screw down onto. It's about 6 threads or 1/4" on a standard 1 3/4" stud. Anybody else have this problem? I'm nervous that the polylocks will come loose. How much stud was there left for those who installed the Crane rockers? I also had to use longer pushrods for the rollers to sit properly on the valve heads. I think they were 6.95" vs standard 6.80". Anybody have the same situation?


    Any help or guidance would be appreciated.


    Thanks a bunch,


    Mark